
SSH Into Raspberry Pi: Guide For Windows 11 & Beyond!
Are you looking to unlock the full potential of your Raspberry Pi, seamlessly connecting and controlling it from your Windows 11 computer? The answer lies in the power of Secure Shell (SSH), a robust and secure protocol that allows you to remotely access and manage your Raspberry Pi, transforming it from a standalone device into a versatile tool at your fingertips.
This guide will walk you through the essential steps to establish a secure SSH connection between your Windows 11 machine and your Raspberry Pi. We will cover the necessary preparations, including enabling SSH on your Raspberry Pi, configuring your Windows 11 environment, and exploring different methods for establishing the connection, from the integrated SSH client in Windows 11 to the widely-used PuTTY application. By the end of this comprehensive tutorial, you'll be able to effortlessly command and control your Raspberry Pi from the comfort of your Windows 11 computer, opening up a world of possibilities for your projects and experiments.
| Aspect | Details |
|---|---|
| Subject | Raspberry Pi SSH Access from Windows 11 |
| Primary Goal | To establish a secure and remote connection to Raspberry Pi for control and access. |
| Target Audience | Users seeking to manage their Raspberry Pi from their Windows 11 computer. |
| Key Technologies | Raspberry Pi, Windows 11, SSH, PuTTY (optional), Command Prompt/PowerShell |
| Core Concepts | Enabling SSH on Raspberry Pi, Finding IP address, Using SSH client in Windows 11 and using PuTTY. |
| Use Cases | Remote control of Raspberry Pi, running commands, file transfer, and system administration. |
| Difficulty Level | Beginner to Intermediate |
| Resources | Official Raspberry Pi Foundation |
Before diving in, it's crucial to understand that the SSH feature on your Raspberry Pi is often disabled by default for security reasons. This is a prudent measure, as it helps to prevent unauthorized access to your device. However, fear not; enabling SSH is a straightforward process that we will cover shortly.
- Cardi B New Look A Transformational Style Statement
- Doctor Dubai Salary Understanding Earnings In The Medical Profession
Preparing Your Raspberry Pi
The first step is to prepare your Raspberry Pi for SSH access. This involves enabling the SSH server on the device. Here's a step-by-step guide:
- Enable SSH on Boot: The most convenient method for enabling SSH is to do so before you even boot up your Raspberry Pi for the first time. Safely eject the SD card from your Raspberry Pi. Then, insert the SD card into your computer.
- Access Boot Partition: Navigate to either the '/bootfs' or '/boot' directory, depending on your operating system, on the SD card.
- Create the 'ssh' File: Create an empty file named 'ssh' (without any file extension) in the '/boot' directory. The presence of this file on the SD card will automatically enable SSH when the Raspberry Pi boots.
- Insert and Power On: Safely eject the SD card from your computer and insert it into the Raspberry Pi's card slot. Connect power to the Raspberry Pi. SSH will be enabled automatically during the boot process.
Finding Your Raspberry Pi's IP Address
- Choosing Between Primer Or Sunscreen First The Ultimate Guide
- 25th October Horoscope Insights And Predictions For Your Zodiac Sign
To connect to your Raspberry Pi via SSH, you'll need its IP address. There are several ways to find this:
- If you have a monitor and keyboard connected: Boot your Raspberry Pi, log in, and use the command `hostname -I` in the terminal. The IP address will be displayed.
- Using your Router's Interface: Most routers provide a list of connected devices along with their IP addresses. Access your router's configuration page (usually by typing its IP address in a web browser), and look for the connected devices list.
- Using an IP Scanner: There are several network scanning tools available for Windows that can scan your local network and identify devices, including their IP addresses.
Preparing Your Windows 11 Computer
Your Windows 11 computer needs to be updated and connected to the same local network as your Raspberry Pi. Fortunately, Windows 11 comes with an integrated SSH client that you can access through the command prompt or PowerShell.
Connecting via SSH from Windows 11
There are a couple of methods for connecting via SSH from Windows 11:
- Using Command Prompt or PowerShell: Open either the Command Prompt or PowerShell by clicking the Start menu and typing "cmd" or "powershell," respectively, then pressing Enter.
- Using the SSH Client: Type `ssh pi@` in the command prompt or PowerShell, replacing `` with the actual IP address of your Raspberry Pi (e.g., `ssh pi@192.168.1.100`). You might be prompted to accept the server's host key the first time you connect. Type "yes" and press Enter.
- Enter Credentials: You will be asked for your login credentials. The default username is "pi," and the default password is "raspberry."
Connecting via PuTTY
PuTTY is a popular, free, and open-source SSH client for Windows. If you prefer a dedicated SSH client or are more comfortable with a graphical interface, PuTTY is an excellent choice. You can download PuTTY from its official website. Follow these steps to connect using PuTTY:
- Download and Install PuTTY: Download the PuTTY executable and install it on your Windows 11 computer.
- Launch PuTTY: Open PuTTY.
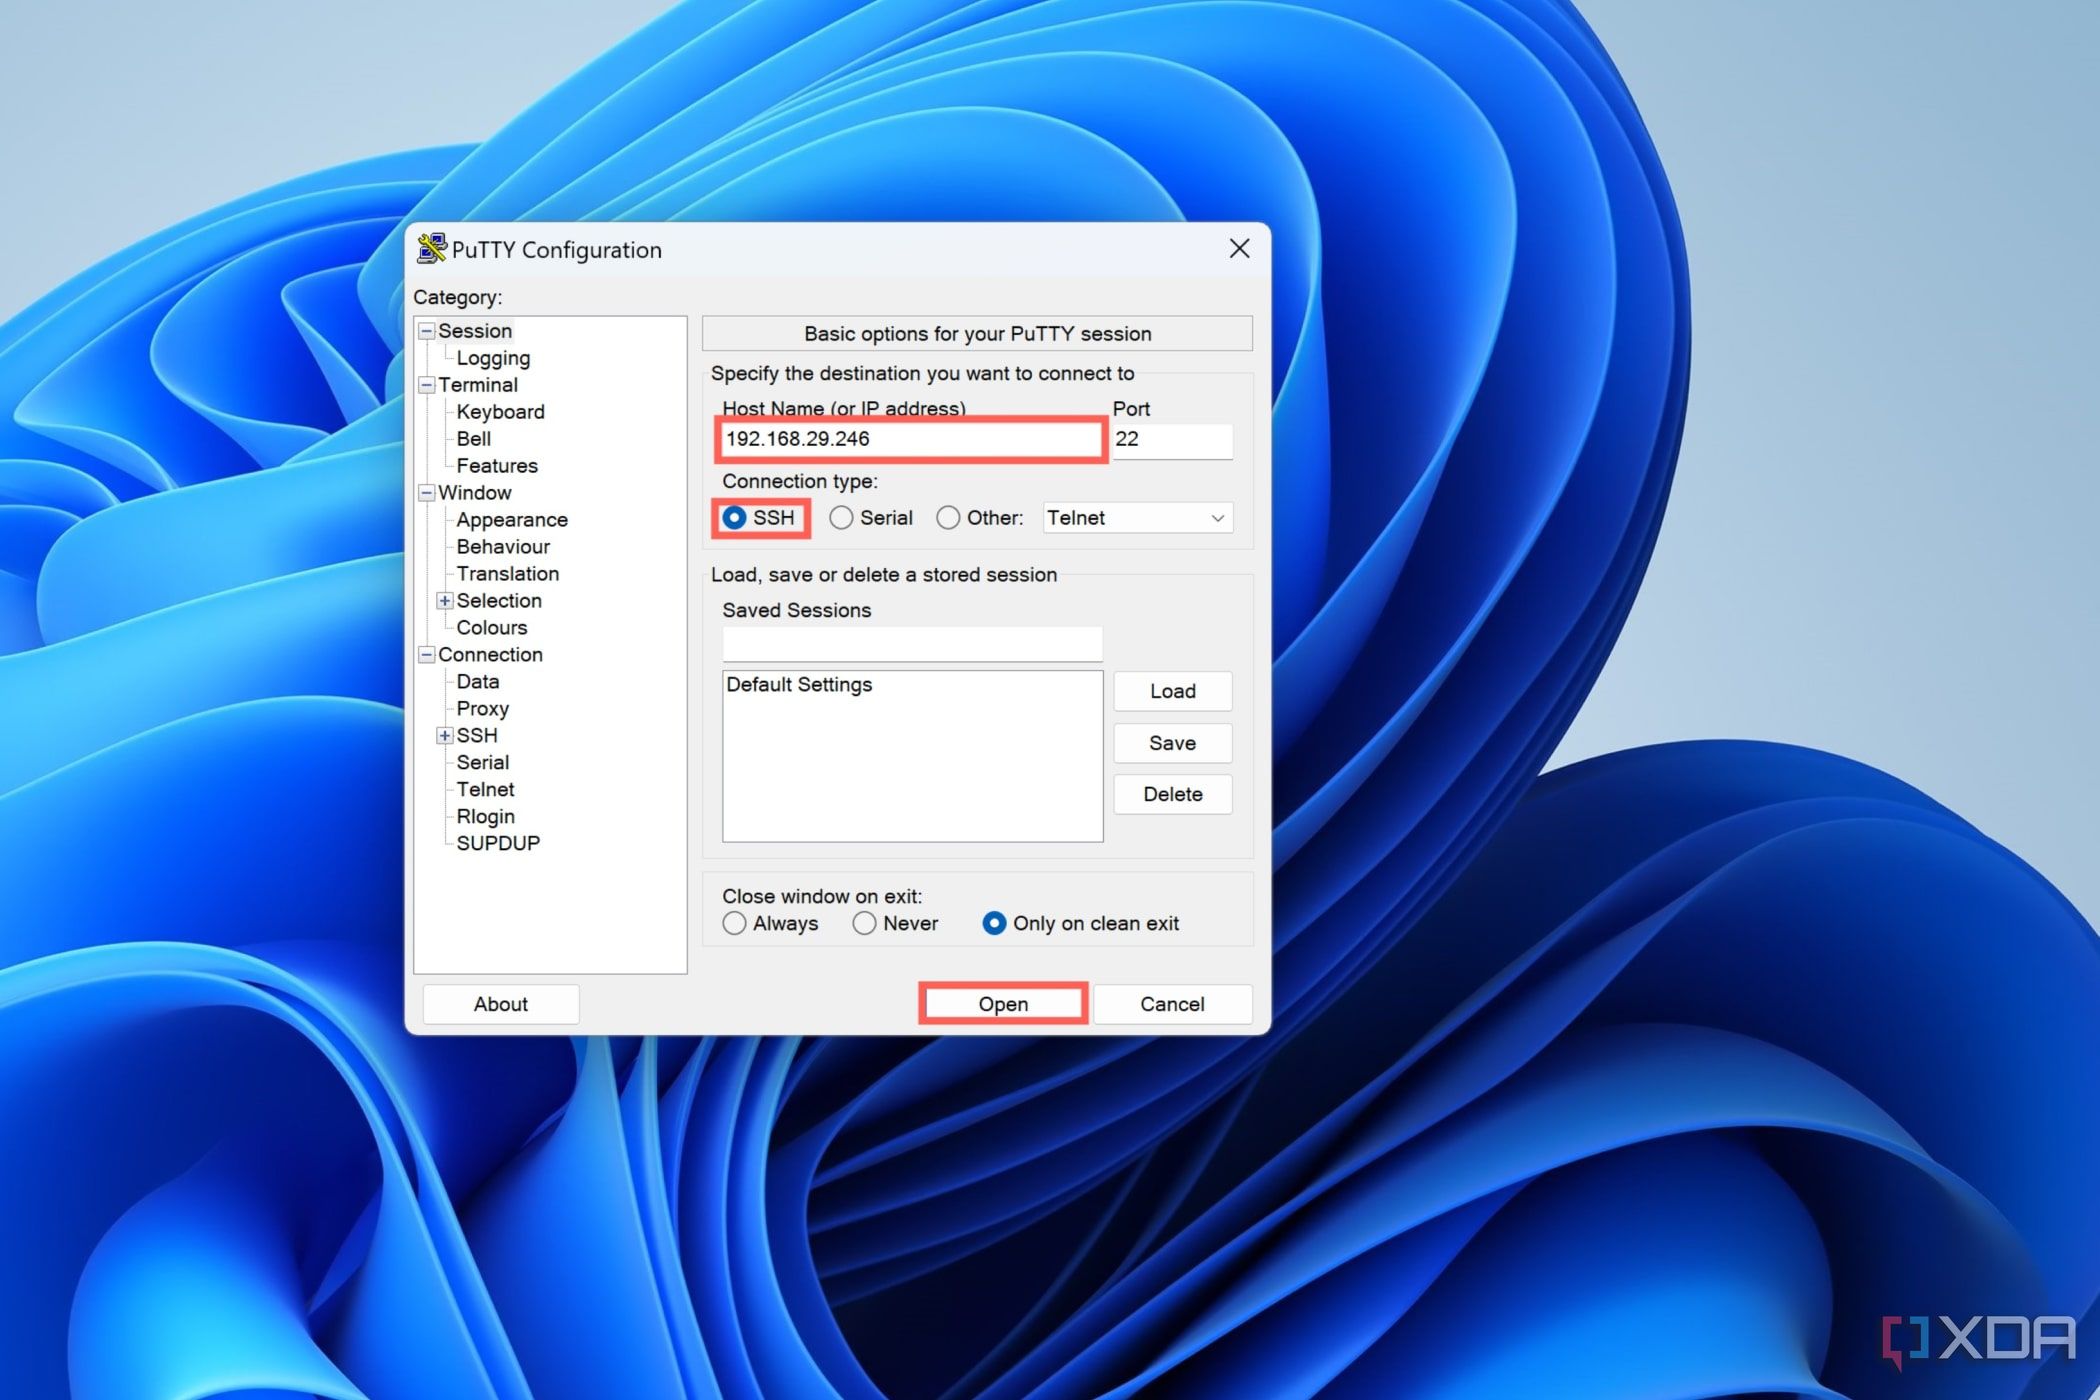
- Enter IP Address: In the "Host Name (or IP address)" field, type the IP address of your Raspberry Pi.
- Port and Connection Type: The "Port" field should be set to 22, and the "Connection type" should be set to "SSH."
- Save the Session (Optional): You can save the session settings for future use by typing a name in the "Saved Sessions" field and clicking "Save."
- Click "Open": Click the "Open" button to initiate the SSH connection.
- Enter Credentials: You will be prompted for your username and password. Enter the same credentials as you would use when connecting via the command line (usually "pi" and "raspberry").
Troubleshooting
If you encounter any issues, consider the following troubleshooting steps:
- Network Connection: Ensure that both your Windows 11 computer and your Raspberry Pi are connected to the same local network.
- SSH Enabled: Verify that SSH is enabled on your Raspberry Pi. Check the '/boot' directory of your SD card for the 'ssh' file, or verify that you enabled SSH through raspi-config (if you have display access).
- IP Address: Double-check that you are using the correct IP address for your Raspberry Pi.
- Firewall: Your Windows 11 firewall might be blocking the SSH connection. If you are using the built-in Windows Firewall, you may need to allow inbound connections on port 22.
- Login Credentials: Ensure that you are using the correct username and password. The default username is "pi," and the default password is "raspberry."
Beyond the Basics: Useful Commands and Considerations
Once you have successfully connected to your Raspberry Pi via SSH, you can start executing commands. Here are some useful commands to get you started:
- `sudo apt update`: Updates the package lists.
- `sudo apt upgrade`: Upgrades the installed packages.
- `sudo raspi-config`: Opens the Raspberry Pi configuration tool, allowing you to change settings like the password, hostname, and network configuration.
- `ls`: Lists the files and directories in the current directory.
- `cd `: Changes the current directory.
- `pwd`: Prints the current working directory.
- `mkdir `: Creates a new directory.
- `rm `: Removes a file.
- `nano ` or `vim `: Opens a text editor to edit a file.
It's crucial to update your Raspberry Pi regularly to ensure that you have the latest security patches and software updates. Use the `sudo apt update` and `sudo apt upgrade` commands to do this.
Security Best Practices
While SSH is a secure protocol, it's important to take additional steps to enhance security:
- Change the Default Password: The default password ("raspberry") is a major security vulnerability. Change it immediately after your first SSH connection using the `passwd` command.
- Use Strong Passwords: Choose a strong, unique password that is difficult to guess.
- Disable Password Authentication (Advanced): For increased security, consider disabling password authentication altogether and using SSH keys. This involves generating a key pair (a public key and a private key) and adding the public key to your Raspberry Pi. Then, you can log in without entering a password.
- Keep Your System Updated: Regularly update your Raspberry Pi's operating system and software packages to patch any security vulnerabilities.
- Firewall Configuration: Configure your firewall to restrict SSH access to specific IP addresses.
Advanced Usage: SSH Key Authentication
For a more secure and convenient login process, consider setting up SSH key authentication. This eliminates the need to enter your password every time you connect. Here's a basic overview:
- Generate an SSH Key Pair: On your Windows 11 computer, use a tool like PuTTYgen (part of the PuTTY package) to generate a key pair. This will create a public key (which you'll upload to your Raspberry Pi) and a private key (which you'll keep secure on your Windows 11 computer).
- Copy the Public Key: Copy the content of the public key from PuTTYgen.
- Add the Public Key to Your Raspberry Pi:
- Connect to your Raspberry Pi via SSH using the password-based authentication.
- Open the `~/.ssh/authorized_keys` file (create the `.ssh` directory and file if they don't exist).
- Paste the public key into the `authorized_keys` file and save it.
- Configure PuTTY (Optional): In PuTTY, you can configure the private key to be used for authentication under "Connection -> SSH -> Auth."
- Test the Connection: Try connecting to your Raspberry Pi again using PuTTY or the command line. You should now be able to log in without entering a password.
Working with OpenMediaVault (OMV) and FileZilla
A user mentioned accessing their Raspberry Pi 4 with OpenMediaVault (OMV). OMV is a network-attached storage (NAS) solution that can be installed on a Raspberry Pi. To access OMV, you might use the web interface (typically accessed through a web browser using the Raspberry Pi's IP address) or protocols like SMB/CIFS for file sharing. You can manage OMV settings through its web interface once you've connected to the Raspberry Pi's IP address with a web browser.
FileZilla is a popular FTP client. While SSH is used for command-line access, FileZilla can be used for secure file transfer (SFTP) if SFTP is enabled on your Raspberry Pi. With SFTP, you can connect to your Raspberry Pi using your IP address, username ("pi" by default) and password to transfer files between your Windows 11 computer and Raspberry Pi. SFTP is a secure method for transferring files over SSH.
WSL and SSH
While you can use PowerShell or the integrated SSH client in Windows 11, for more advanced users, leveraging the Windows Subsystem for Linux (WSL) is also a powerful option. If you have a Linux distribution installed within WSL, you can use the SSH client within the WSL environment. This can be helpful if you're comfortable with the Linux command line and need to manage multiple machines.
Conclusion
In conclusion, accessing your Raspberry Pi from your Windows 11 computer via SSH opens up a world of possibilities. By enabling SSH on your Raspberry Pi, configuring your Windows 11 environment, and utilizing tools like PuTTY or the built-in command-line client, you can securely and efficiently manage your Raspberry Pi from anywhere on your network. Remember to prioritize security by changing default passwords, using strong passwords, and considering advanced configurations like SSH key authentication. With these steps, you can harness the full potential of your Raspberry Pi and take your projects to the next level.
Article Recommendations
- Mastering The Art Of Dying Bangs A Complete Guide For Stylish Transformations
- Ultimate Guide To Aveeno Positively Ageless Rejuvenating Serum


Detail Author:
- Name : Elwyn Harber
- Username : ernest.armstrong
- Email : upouros@glover.biz
- Birthdate : 2005-05-24
- Address : 2411 Andy Points West Annebury, IL 10256
- Phone : 1-206-565-6316
- Company : O'Reilly, Windler and Nader
- Job : Environmental Scientist
- Bio : Optio omnis inventore aut assumenda voluptas. Eos dignissimos sit similique autem. Libero quos autem velit eveniet voluptatem ducimus.
Socials
tiktok:
- url : https://tiktok.com/@melvina_xx
- username : melvina_xx
- bio : Provident deleniti et consequatur sequi dolorem.
- followers : 3824
- following : 1240
facebook:
- url : https://facebook.com/schinner2020
- username : schinner2020
- bio : Et autem dolor esse hic. Amet molestias nobis assumenda rerum.
- followers : 5135
- following : 2017
instagram:
- url : https://instagram.com/schinner1995
- username : schinner1995
- bio : Voluptatibus modi rerum ab ut ut fuga repudiandae rem. Rerum repellat in eos eaque.
- followers : 1964
- following : 2000
linkedin:
- url : https://linkedin.com/in/melvina2554
- username : melvina2554
- bio : Nobis sequi voluptas velit debitis non.
- followers : 3696
- following : 2035
twitter:
- url : https://twitter.com/melvina_schinner
- username : melvina_schinner
- bio : Eligendi rerum eum nihil magni mollitia. Soluta ut saepe unde ipsam nostrum sunt temporibus. Ea ipsum corporis et aut ratione quia deleniti.
- followers : 1242
- following : 574
